Difficulty level
Intermediate
Time to Complete
Evening
Print
Share

Introduction
This design is created for the Maxi Hoop (40 x 21 cm) for the
B 780,
B 790,
B 880.
You will experience the basic tools to create the envelope with
PaintWork and embroidery, create a
CutWork design and a
CrystalWork design.
Software Default Settings
- Start the software with a double click on the desktop icon.
- In "New design" click "cancel".
The software will start with the layout settings it was used last. So if your status bars, toolbar, object properties and palette are looking different, you may adjust the layout or work comfortably with your personal settings.
- To change the Software language, click on "Werkzeuge", "Optionen", "Sprache" and select English
- "Stufen Rückgängig", select 100
- "Mess-System", select "Metrisch" for the metric system
- Close the program to have the changes activated.
- Open the DesignWorks software.
The software layout can also be adjusted while working with the software.
Tool Options are only active when the tools are selected or used the manual can be opened via start, all programs, BERNINA DesignWorks Manual.
PaintWork
This design is created for the Maxi Hoop (40 x 21 cm) for the B 780, 790, 880.
- Open a new document.
- Fabric: Select appropriate fabric type, chose "none", white.
- Artwork source, select "from file", "grafik vorlage envelope complete.png"
- Hoop: BERNINA Jumbo Hoop for B 780 and B750 #93.
- Continue.
- Artwork Image: "open as Backdrop" and click "Continue".
The file is opened. If the Artwork does not show:
- View,
- Backdrop,
- Below Embroidery.
- Zoom in (mouse-wheel) to the center line of rhombus. Left-click once.
Save the design to the USB Stick as "paint-envelope" for further use.
All DesignWorks files are saved as. Draw.
- Activate "Create Outline Shape".
If it is not visible at first glance, find it here.

- Place the mouse over the center of the backdraw, with the mouse-wheel zoom in to the center line.
- Press the shift key and digitize a rhombus over one of the center line rhombuses.
- To complete, click on the first point.
- Click and shift = corner (Click = curve)
By default, the shape has a painted fill and a running stitch outline.
- With "Rectangle Selection" mark it.

- By clicking on the "Brushes" outline, the left upper empty triangle, the object properties change to a paint outline.
The paint fill remains.
- Mark it with "Rectangle Selection", change size to 20mm width, 10mm height (it will be slightly larger than the artwork backdrop).
- With "Edit Shape Nodes", correct the form if required.

- Set the stroke direction.

- In the "Palette" "Brushes", change its outline and fill to blue.
- Select it with "Rectangle Selection".
- Duplicate it.
- Move the still marked and active duplicate to the backdrop rhombus on the right.
- Change its outline and fill to red.

- Mark both elements, duplicate them and pull them to the right of the first two.
- Mark all four elements, duplicate them and pull them the right of the first four.
- Of the eight elements, delete the first blue one.
- Mark the left two, right-click and "break apart".
- Select all elements and "breakt apart".
- Select all 7 elements and move them into center position over the backdrop.
- This is the envelope center line, where the envelope will be folded.
- While all elements are still marked, duplicate them and move them to the top horizontal line on the backdrop.
- Duplicate the still marked line of elements and move them between the two lines.
- Pick the line at one corner and turn it 90°.
- Reduce its width to 5mm.

- Move this group to sit just over the left backdrop line.
- Right-click on the vertical group and "ungroup" it.
- In this line, mark a blue, red and blue combination, duplicate it and move it to the end of the line.
- Mark all elements of this vertical line.
- Duplicate the row and move it over the right vertical line on the backdrop.
- Right-click and "break apart".
- Mark both vertical lines and position them just above the bottom line of the envelope.
- Save your design for further use as "envelope paint".
- To check the look of your paintwork: view, backdrop, hide.
- Retrieve your backdrop "below embroidery".
- Mark all elements. Right-click and ungroup/break apart if necessary. Ungrouping needs to be done to sort by colors, i.e. first all elements need to be individuals.
- Mark one red element. In the color bar "brushes", right-click on the red color, select by, pen color, all red designs are marked. Within the marked designs, right-click, combine. All red will now be painted one after the other.
- Mark one blue element. In the color bar "brushes", right-click on the blue color, select by pen color, all blue designs are marked. Within the marked designs, right-click, combine.
- Check the fill to be "none".
- Address the sender "Greetings from Switzerland". Mark the text. Grab it at one corner and turn 180°. Place it.
- Mark your sender text.
- Activate the black outline.

- Check the fill to be "none".
- Save your paintwork for further use.
Embroidery
To the PaintWork now stitching is added.
- Zoom to the stamp (mouse-wheel).
- With shift pressed, digitize a rectangle within the stamp marking of the backdrop, i.e. on each side approx. 2mm smaller than the stamp.

- Edit the shape if required.

- From the palette of Threads, assign it a green thread "outline".
- In the Object Properties. select fill: none.
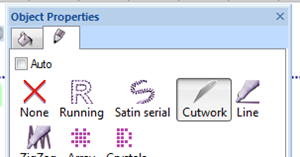
- Select the outline to be "Running" and None (for a single straight stitch).
- Set the stitch length to be 3mm.
- This stitching is for the stamp to be sewn onto the envelope.
- While the rectangle is still marked, duplicate.
- In the Tool options, "proportional active, scale it to be 90%.
- Assign it a clear green thread "outline". Select the fill: none. Select the stitch to be "running, style none, stitch length 4mm. This stitching is the placement line for the stamp.
- Change the sequence to have the larger rectangle as sequence 6. Drag and drop 5 to 6.
- Save the design.
- Zoom to the sewing machine.
- With shift pressed, digitize the sewing machine outline.
- Edit the shape if required.
- From the palette of Threads, assign it a red thread "outline".
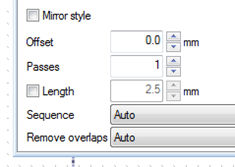
- In the Object Properties. select outline "Running" and "Chain" for chainstitch.
- Set the stitch length to 2.5mm
- Fill: none.
- This stitching is a "validation for the stamp.
- Zoom to the Edelweiss.
- Create ellipse, draw a small circle over the yellow center of the Edelweiss. In the Palette Threads assign it a yellow thread outline. In the object properties of the outline assign running and none, stitch length 2.5. In the fill select: none.
- This is the placement line for the Edelweiss.
- While the circle is still marked, duplicate.

- In the Tool options, the still active copy, size it to be approx. 12mm wide and high.
- In the Palette Threads, Assign a different yellow/orange outline.
- In the Object Properties, Outline, select stitch 119, set stitch length to 5mm. Fill: none.
- Save the design.
- Zoom out so that the complete backdraw is visible.
- For sewing the lining to the envelope, stitching in the hoop is used. With shift pressed, digitize an envelope outline, just around the paint design, starting 1cm below the left bottom corner, adding a triangle closure on top, ending 1cm below the right bottom corner.
- Palette Threads Outline: purple. Object Properties Running, double, stitch length 3mm. Fill: none.
- For placing the material onto the stabilizer, it is stitched into the hoop. With shift pressed, digitize an outline around the whole paint design, allowing 1cm seam allowance, i.e. on all four sides 1 cm larger than the stitching. Palette Threads Outline: pink. Object Properties Running, none, stitch length 4mm. Fill: none.
- Sequence: With shift, mark sequence 10 drag and drop it to be 1: This step has to be first: stitching material onto the stabilizer.
CutWork
- This design is created for the Medium Hoop (10 x 13 cm) for the B 780, 790, 880, 580.
- Open a new document.
- Select fabric: none, white. Continue.
- Artwork source, from file, select "instructions cutwork-stamp-flower.eps".
- Hoop, Medium Hoop 130 x 100, # 44C.
- Color reduction, select the number of colors in the "Brushes to use", to be one (black).
- Click continue.
- The design is opened with an outline.
- Sequence shown: 1
- By default, the design has an outline Line painted in black, no fill.
- Save the design on the USB Stick for further use as "Cutwork stamp".
- Select the stamp, check its size to be 45mm wide, 38mm high.

- With shift pressed, select stamp and both flower pieces.
- In the object Properties, assign outline "cutwork". Fill, select: None.
- As the "Discard part" select External.
- With shift pressed, select all three sequences. Right-click and combine. Results in one sequence. This combines that the cutting will be done from steps 1 to 4 for all elements together.
- Save the design for further use.
- With "slow redraw", check how your design will be executed.
- Export the design to the USB Stick for use on the embroidery machine.
- The design will be converted into an .exp format automatically.
CrystalWork
This design is created for the Small Hoop (5 x 7.2 cm) for the B 780, 790, 880, 580.
- Open a new document and choose "New design".
- Select fabric: none, white. Continue.
- Artwork source, select New graphic.

- Hoop: Small Hoop, 50 x 72, # 48C.
- Save the design to the USB Stick as "crysta-heart" for further use.
As reference for the crystal design, the stamp size is used, respectively the stamp sewing lines, i.e. the size shall not exceed 34mm in width and 26mm in height.
- As template for the heart, in the toolbar "Tools" select Insert Symbol
- Change to Font "Symbol"
- Scroll down to the heart and click "insert".
- Select the design.
- Change the Object Properties to "no fill" and outline Crystals.
- In the now showing Object Prperties, select crystal size SS 10.

The tool option "export" is inactive.
To bring the design to the machine go to:
Activate export and USB, save.
In case a crystal design is combined with the other DesignWorks options, the transfer of the CrystalWork to the sewing machine is as follows:
- File Export Crystals to machine
- Activate export and USB, save.
Personalize Address
For the envelope, templates for all DesignWorks have been prepared.
If you want to personalize your address typing in the design used for the project, proceed as follows:
- Open the prepared envelope paint from file: umschlag-def.draw.
- Zoom in to the address and delete the text.
- Type your address.
- Check the size to be max. 40mm in height and max. 80mm in width.
- Position it between the rhombus lines and the stamp.
- In the sequence, place it as 8 (drag and drop from 15 to 8).
- Save the design for further use under your name on the USB Stick.
- Export to USB for use on the embroidery machine.
Done!
We wish you a lot of fun with the DesignWorks-Project.