Ready to create your personal Boho Bag?

Difficulty level Intermediate
Time to Complete Evening
Print

Share

idontcare

A quick and simple project packed full with lots to learn.

You will need:

Fabric & notions
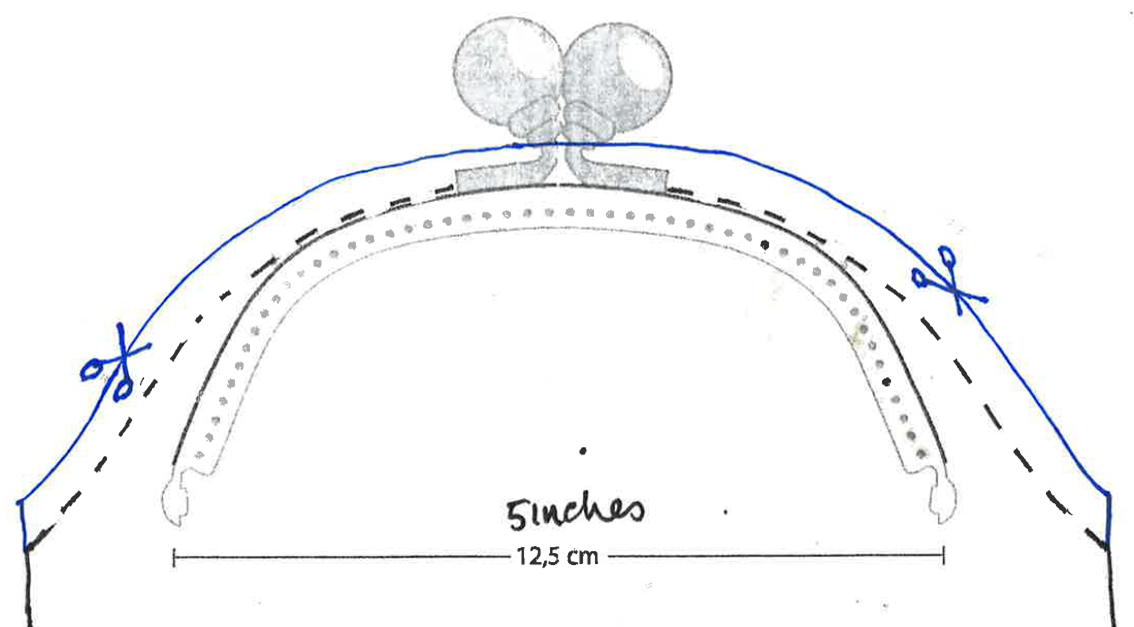
  • 1 piece of Ultra Suede 15" x 7" (may need interfacing)
  • 1 piece of colorful Lining 15" x 7
  • 1 piece of Stabil Stick Stabilizer Tearaway 18" x 11"
  • 1 x 5 inch Purse Closure (Brewer)
  • Cord for the strap (optional)
Needle & threads BERNINA machine & accessories

Note:
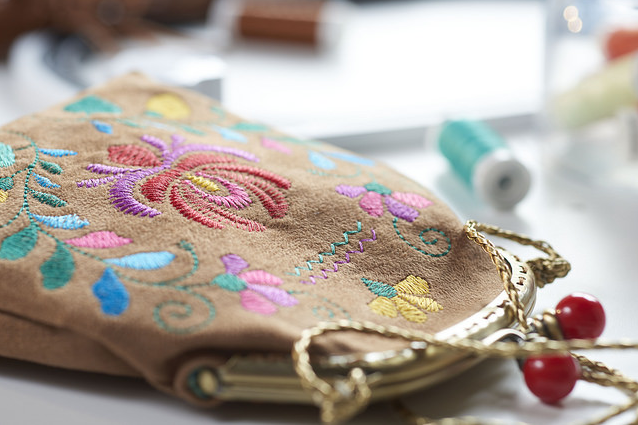
We used with the Polysheen or Isacord Thread the colors: 
Red 1805, Dark pink 2721, Turquoise 4111, Green 5100, Yellow 506

Machine Setup

  • Install SUK needle size 80 
  • Thread the machine with red (1805)
  • Wind a bobbin with white Mettler bobbinfil 
  • Thread it for embroidery
  • Attach the CutWork/Straight Stitch Plate to the machine
  • Attach the Teardrop Embroidery Foot #26

Picture: Boho Bag

The Design

  • Select the design folder: Folder 11 and Design 15
  • Choose the Midi Hoop icon in the Hoop screen
  • Go to Emroidery Settings: Off Centered Design should NOT be activated

Picture: Boho Bag

Reduce the Colors

  • Go to the Color palette and select color 3
  • Select 0-9 and choose the 1805 (red) Isacord 40
  • Go back to the palette and change color 5 and 6 to Isacord 4111 (Turquoise)
  • Scroll to 2/2 to color 8 and change it to Isacord 5100 (Green)
  • Return to edit
Note:
Don't forget to click "select"

Picture: Boho Bag

  • Click on the "i" button and select the Group embroidery icon
  • Select Ungroup
  • The design is split to 8 color layers and we will reduce to them to 5
  • Go to Rearrange and move the colors together by selecting the color you want and move it below or above the layers, move it with the arrows on the right
  • Start with layer 3 (red) and move to layer 2, then layer 8 to layer 5 (green)

  • Select the "i" button again and go to Group embroidery
  • Select the lower layer of the color from the layers that need to be grouped
  • First red, followed by green and turquoise
  • Select Group, you will be left with 5 color layers (including the combined layer below)
  • If necessary use Undo

Picture: Boho Bag

Create Space for the Monogram

  • Select layer 2 (Dark pink) and Ungroup
  • Delete the zig zag layer by swiping it to the right or left and confirm
  • Select the lowest layer and go to Group Embroidery then Group two times to re-group
  • Select layer 3 (Green) and select Ungroup (do the same with layer 4)
  • Delete the zig zag layer - 4
  • Select the lowest layer of green and select Group two times to re-group

Picture: Boho Bag

Prepare to Embroider the design

  • The 5 color design is ready to stitch
  • If the suede is soft, hoop towards the narrow end of the stabilizer, paper side upward (so it will remain after embroidering and can be used as an interfacing)
  • With a pin, tear off the paper inside the hoop
  • Fold the suede in half and mark it with an X at 1 inch and 6 inches from the top
  • Stick down the suede at the top of the hoop, it doesn't have to be straight

  • Select "i" and Pinpoint Placement
  • Select grid then the center top point and place the needle on the 1 inch marking in the hoop
  • Make sure you select SET
  • Select the center bottom point on the screen and move the needle to the lower center mark
  • Select SET and close the screen

Picture: Boho Bag

  • Go to the Embroidery Settings and activate Unit of measurement to inch
  • Return to the embroidery setting screen with the "breadcrumbs"
  • Activate Thread Away Mode and Invisible Secure, activating at start and end
  • Activate Automatic Jump Stitch and set the length to 1mm
  • If you aren't sure which icon you need to use, click on the question mark
Note:
that the manual cutting after 7 stitches is off as default

Begin the Embroidery

  • Go to the sew out screen and ensure that cutting Connectung stitches and Color resequence is activated
  • Use the needle up/down button to bring up the bobbin thread just to try
  • Begin to embroider stitch the whole design and select the flag on finishing
Hint:
On this project we will work with the Thread Away Mode because our project is lined and we don't need to worry about trimming the threads on the back.

Picture: Boho Bag

Make it yours

This is done as a separate exercise to use Pinpoint Positioning a second time, we will now prepare a monogram.

  • Select Fonts and Curly Script No. 30 and select 2 capital letters of your choice.
  • Reduce the size to about 2 x1 inches
  • Select "i", Pinpoint Positioning and the grid
  • Select a point on the grid and use the needle to bring the letters into the correct position
  • Stitch out the letters in the color of your choice.
Note:
Select set after each action. It could change a little in size and that is OK as long as it fits nicely into the space. 
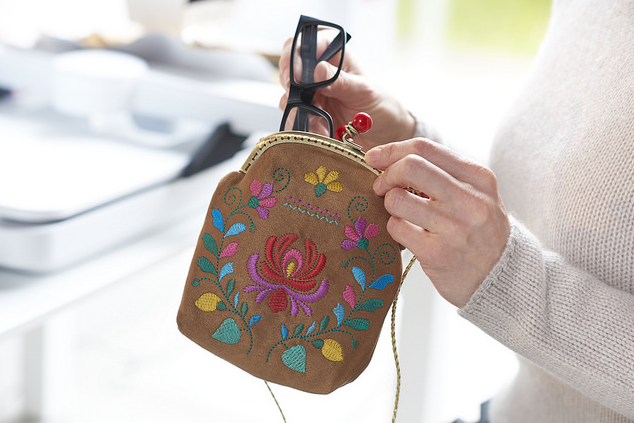
Picture: Boho Bag

Prepare the bag pattern

  • Remove the stabilizer from the back of the design if it's not needed as interfacing
  • Use the paper pattern to shape both ends of the suede
  • Do the same with the lining piece

  • Go to sewing mode and thread the machine for sewing with the brown metrosene thread
  • Don't forget to alter change the threading underneath for sewing and select straight stitch
  • Move the needle position 3 places to the right
  • Attach the 9mm stitch plate and the Foot #1D and engage Dual Feed

  • Fold the right sides together and stitch down each side, securing top and bottom don't forget to use the thread cutter
  • Open the side seams, use the sew table to mark 1 inch from the corner
  • Stitch across the corner with straight stitch, securing at the start and end

To sew up the lining

  • Fold the right sides together and sew the first side
  • Using a 1/4 inch seam (Needle position 4 to the right)
  • On the other side leave a 3 inch gap for turning through
  • Shape the bottom of the lining exactly like it was done with the outer bag

Complete the bag

  • Stitch the bag and lining together along the top edge with the right sides together and with a 1/4 inch seam (needle position 4 to the right)
  • Turn through to the correct side and stitch up the hole in lining with the straight stitch (needle positon 1 to the right)
  • Moving the edge of the seam to the inside edge of the foot
  • Topstitch the top of the bag, this helps with the attaching of the clasp
  • Thread a hand needle double with the cordonnet thread
  • Mark the center of the clasp and the bag top with the chalk and handsew the clasp onto the top of the bag

Done!

And your chick Boho Bag is ready to store your personals! We hope you will have fun doing this item. :)