
Božské kvety prikrývka
V mnohých krajinách je šitie prikrývok na špeciálne príležitosti súčasťou rodinnej tradície. Jedinečné a personalizované vzory robia z tohto tradičného umeleckého diela výnimočný a hodnotný darček.
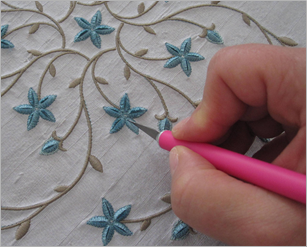
Nádherné kvety a rozkošné viničné listy zvýrazňujú túto nádhernú patchworkovú hodvábnu prikrývku. Úžasné výšivky z kolekcie výšiviek Divine Flowers & Vines pridávajú luxusné detaily. Špeciálne navrhnuté vyšívacie stehy so zamatovým vzorom poskytujú jedinečný efekt. S BERNINA 830 ako partnerom pre návrh môžete ľahko prešívať a vyšívať túto jednoducho božskú deku.…
Construct the Quilt
-
Prepare the silk fabric by fusing ArmoWeft interfacing to the back of each fat quarter.
-
Cut out silk following the pattern instructions.
-
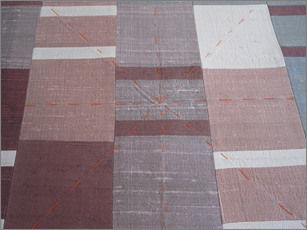
Construct the quilt top following the pattern instructions. If using the Pink Power Quilt Pattern, you will not need all of the rectangle units for the 44" x 56" quilt shown here, which is only 16 rows across (it is the same length as the one in the instructions). You can use all of the rectangle units if you desire—your quilt will just be slightly wider than the one shown.
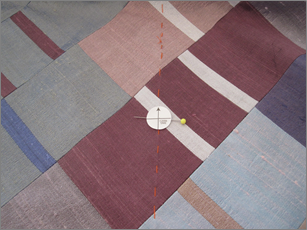
Using a hand-sewing needle, sew a line of long basting stitches through the center of the quilt from top to bottom, then a line through the center from side to side. Next baste from each corner to the center of the quilt. These basting lines will be used as guides for positioning the designs.
Embroider the Quilt
See below for layout details
-
Print templates for these designs:
-
BE110215—five copies
-
BE110210—twelve copies
-
BE110212—eight copies
-
BE110222—four copies
-
Position the templates on the quilt and arrange according to the embroidery layout guide on page 3, or as desired.
TIP: Layout the designs using BERNINA Embroidery Software 6, then print templates of the finished groupings.
-
Start the embroidery process with the center wreath. Replace each template with a target sticker.
-
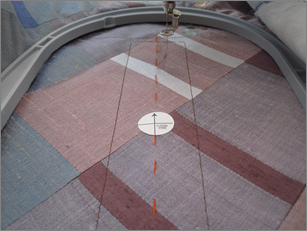
Cut a piece of Ultra Clean & Tear stabilizer large enough to hoop. Spray it with 505 Quilt Basting Spray and affix it to the back of the fabric where the embroidery design will be stitched. Hoop the fabric/stabilizer together in the Jumbo Hoop.
TIP: Use the Master Hooper® as an aid for trouble-free hooping!
-
Use the built-in basting box to baste around each embroidery design before stitching.
TIP: For the BERNINA 830, change the presser foot height (in the embroidery settings) to 10mm; this allows for the extra height of the "velvet" stitches.
Embroider each design in the center wreath, removing the target sticker before stitching.
-
Embroider the trailing vines (design BE110210) from the corners toward the center.
-
Embroider the outer ring of eight roses (design BE110212).
-
Embroider the center top, bottom, and side designs.
-
When all embroidery is complete, remove the hand-basting stitches and basting boxes and clip the jump stitches.
Quilting in the Hoop
-
To assist in placement, print templates for these designs in BERNINA Embroidery Software Version 6:
-
BEC00704— one copy
-
BEC00737—four copies
-
BEC00731—sixteen copies
-
Position the templates on the quilt and arrange according to the embroidery layout guide on pages 4 & 5, or as desired. Pin templates in place.
-
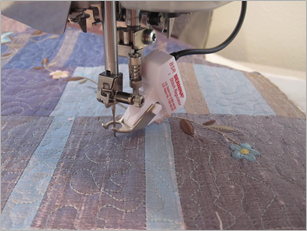
All the quilting designs are done without any stabilizer and by hooping all 3 layers of the quilt.
-
Use Isacord #0722 in both the needle and the bobbin for all the quilting designs. Thread the bobbin as you would for regular sewing. Adjust needle tension if needed.
-
Begin with the center motif, then the side motifs, next the diagonal motifs and finally the corner motifs.
All quilting designs line up with the basting lines except the corner quilting designs and the diagonal quilting designs. Layout the diagonal quilting designs as pictured on page 4.
-
Attach the BERNINA Stitch Regulator to the sewing machine. Using Isacord thread color 1352 in the needle and bobbin, stipple quilt the reminder of the quilt.
-
Trim the edges of the quilt as needed, squaring the corners and sides.
-
Sew the binding strips together and bind the quilt using your favorite binding method.
-
Carefully slice the “velvet” stitching areas following the instructions included with the Divine Flowers and Vines embroidery collection.
-
Enjoy your new work of art!
Pomoc pri rozložení prikrývky - Výšivky a quiltovanie
*Rozmery sa vždy merajú od stredu smerom von, s výnimkou rohov, kde sa meria od vonkajšej strany smerom dovnútra.
Smer motívu
Stred motívu
Motív zrkadlovo otočený na výšku (hore/dole)
23" = 58 cm
15" = 38 cm
7" = 17,5 cm
25,25" = 64 cm
32,25" = 81,5 cm
14,75" = 37 cm
22" = 55,5 cm
14" = 35 cm
15,75" = 40 cm
19,75" = 50 cm
18,25" = 46 cm
4" = 10 cm
12" = 30 cm